This "Pfutz's Programming experience with hardware" applies to:
Pinball Magic, Airborne, Flipper Football, & KingPin Pinball
Back to all Capcom Pinball Service Bulletins
Pfutz's Programming experience with hardware
"Lamp Matrix dim light issues"
or
"Detecting shorted diodes in a Lamp Matrix"
Disclaimer: Remember that are getting hardware advice from a software person, would you let your doctor repair your car?
Lamp Matrix Theory:
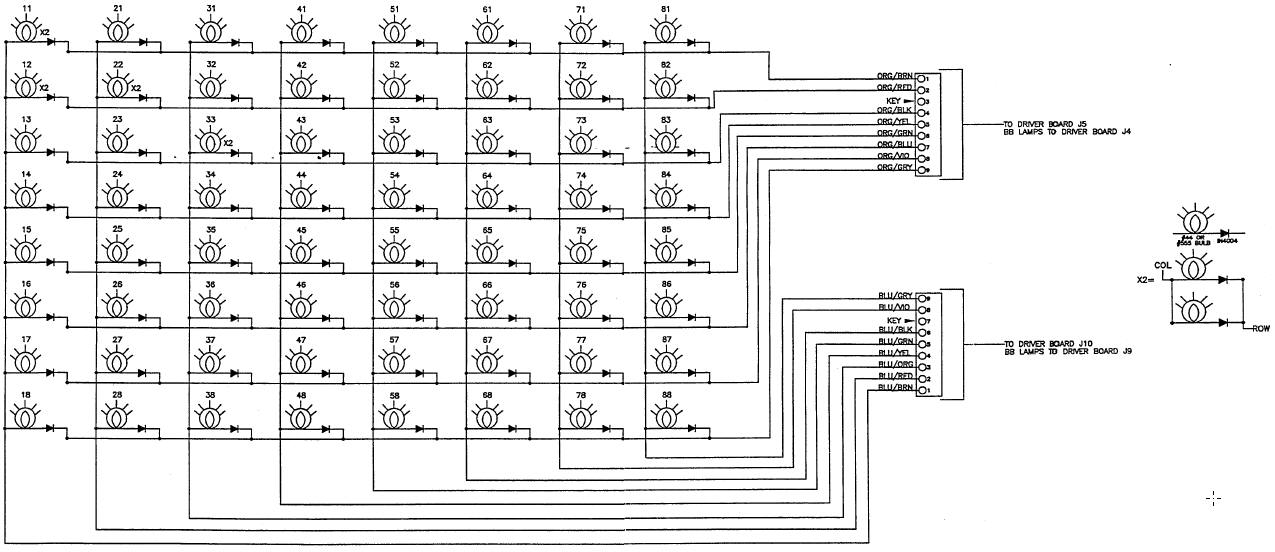
The lamp Matrix is a standard 8x8 X-Y matrix.
Capcom uses 2 lamp matrix's, one called "A" and the other called "B".
But lets just deal with one lamp matrix at a time.
That is we drive one row and 8 columns at a time.
This is repeated for each of the 8 rows (until all 64 lamps have 1 cycle of use).
There are diodes in series with each lamp, this prevents a back current from lighting other lamps in other rows or columns.
If ANY diode is shorted (or not in series with the bulb) it can cause other lamps in other rows to light (Usually dimly, but sometimes brightly too).
In reality, a Capcom Light matrix can handle a maximum of 10 lamps on any row and a maximum of 10 lamps in any column with a maximum of 2 lamps at any location.
The 1 extra lamp would be in parallel with some other lamp (the little "X2=" picture below and right). Do not exceed thes maximums or else the electronics WILL fail.
However, back to the simpler single lamp basic's, the
pinball magic manual
diagram on page 194/199 shows the lamp in series with the diode.
For Single socketed Lamps there are 4 terminals:
The lug on the outside case of the lamp is attached to the columns wire (BLU-??? wire on Lamp Matrix B),
The row (ORG-??? wires on Lamp Matrix B) is attached to the isolated lug that has the diodes cathode (banded side or white side of the diode).
The bottom most lug (which is attached to the bottom terminal of the lamp) WILL NOT HAVE LAMP MATRIX WIRES ATTACHED TO IT!
The only component attached to the bottom lug is the diodes anode (the non-banded side of the diode). (See Below)
The isolated Mounting lug, this is not supposed to be connected to anything.
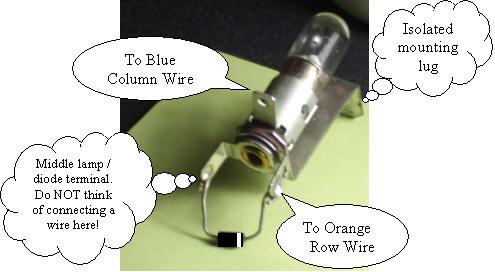 Now when I say shorted, there are 4 terminals on any lamp.
If you mistakenly repair a lamp and attach the wire to the middle lamp/diode terminal,
you have effectively taken the diode out of the circuit and made it look like a shorted diode!
(causing lots of these types of problems).
Sometimes this happens because the diode is on backwards or someone just soldered the wire on the wrong terminal.
Now when I say shorted, there are 4 terminals on any lamp.
If you mistakenly repair a lamp and attach the wire to the middle lamp/diode terminal,
you have effectively taken the diode out of the circuit and made it look like a shorted diode!
(causing lots of these types of problems).
Sometimes this happens because the diode is on backwards or someone just soldered the wire on the wrong terminal.
Other issues are:
Another wire or metal part is touching any metal or wire part on the lamp!
The diode (which hangs in the air) is twisted and the wires are actually shorted together or are touching some other wire.
There have even been issues with the terminals of the "lamp socket", they rotate and slide into each other shorting each other out.
In the extreme cases, the isolated lug is internally shorted to one of the 2 other lugs.
In the extreme cases, the isolated mounting lug is internally shorted to one of the 2 other lugs and/or is touching another wire!
For multiple Lamps on a circuit Board:
Look for burnt or discolored board or parts.
Make sure the connector is on ALL of the pins (and not shifted to the left or the right by 1 or more pins).
Make sure wires and/or metal parts are not touching ANY parts on the circuit board!
Now Identify the "good" and "bad" lamps
To try an identify which lamp(s) (of the 64 lamps) are causing this issue, by identifying a lamp that works and a lamp(s) that appear to be dim.
Usually in the game if you know that one lamp is blinking at normal intensity (assume this is good lamp)
and a 2nd (or more lamps) are dimly blinking at the same time as the good lamp (these are indications of a short diode,
but the shorted diode is not necessarily these dim lamps).
The shorted diode can sometimes be located in a rectangle of lamps and is diagonally opposite the normal intensity lamp.
Now to find the shorted diode (Please turn "off" the game):
For example, say the start button is blinking at normal intensity, and you notice that the continue button is dimly blinking at the same time as the start button,
get their row colors and column colors (page 199/199 Red-Org & Yel-Brn (start) Red-Yel & Yel-Brn (continue) from the manual's lamp matrix chart.

They are circled (see below)
Then find all the rectangles and identify the other lamps in all the rectangles for these rows and columns.
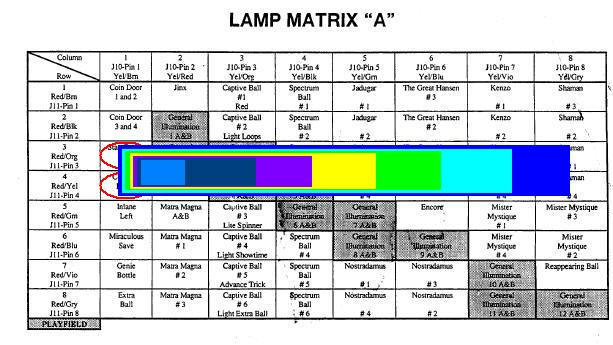 In this example, there are 7 rectangles, so check all the lamps on the Red-Yel row (diagonally opposite the normal intensity lamp).
If all these are OK, check the other lamps in the rectangle (row Red-Org)
If you have a ohm meter that checks diodes (they conduct in one direction with a low resistance, and when you reverse the leads of the meter you will measure very high resistance in the opposite direction)
Use it to check al the diodes in all the rectangles.
If all these are OK, check all the lamps the same column(s).
Lastly, check all the other lamps (and your problem might not be a shorted diode)
If this does not find a trouble spot, it is possible that one of the lamp sockets is defective so that the Row terminal
(banded side of the diode) is internally shorted to one of the other 2 terminals.
The only way I know how to debug this is to unplug the lamp matrix row & column connectors on the driver board,
and unplug the bulb on the lamp socket under test and use an ohm meter or continuity checker and to see of you find a short in any of the 6 cases:
In this example, there are 7 rectangles, so check all the lamps on the Red-Yel row (diagonally opposite the normal intensity lamp).
If all these are OK, check the other lamps in the rectangle (row Red-Org)
If you have a ohm meter that checks diodes (they conduct in one direction with a low resistance, and when you reverse the leads of the meter you will measure very high resistance in the opposite direction)
Use it to check al the diodes in all the rectangles.
If all these are OK, check all the lamps the same column(s).
Lastly, check all the other lamps (and your problem might not be a shorted diode)
If this does not find a trouble spot, it is possible that one of the lamp sockets is defective so that the Row terminal
(banded side of the diode) is internally shorted to one of the other 2 terminals.
The only way I know how to debug this is to unplug the lamp matrix row & column connectors on the driver board,
and unplug the bulb on the lamp socket under test and use an ohm meter or continuity checker and to see of you find a short in any of the 6 cases:
the blue column wire to the isolated middle terminal
the blue column wire to the orange row wire *
the blue column wire to the mounting lug
the isolated middle terminal to the orange row wire
the isolated middle terminal to the mounting lug
the orange row wire to the mounting lug
* = Beware that if there still is a shorted diode that you missed, that you will get the resistance of the light bulb with the short. So maybe try to unplug other light bulbs to find the lamp assembly with the shorted diode!
If all else fails, maybe the there is a short in the wire harness somewhere, or the driver board is defective.
Good Luck!
Pfutz
Pfutz Home
/
Email Pfutz